Thursday, February 27, 2014

Pillow- and blanket case for the doll bed..

My mom thought, that a doll should change its bedding every once in a while.
And by now in know, Moms are always right ;)
Thats why I have the whole thing in yellow here with sewing instructions.

DIY


1.     Measure the pillow and the blanket. In my case the measurements for the pillow are 9x6.2 and for the Blanket 15x10.2.

2.     You can cut the fabric in one piece. That means, the length times 2 plus the tuck-in of approx. 4 plus the seam allowance of approx. 0.4-0.8 times width.

For the pillow that would be 9 + 9 + 4 + 0.8 = 22.8 length and 6.2 + 0.8 = 7 width.

But since I dont have that big of a piece of fabric I cut the back piece with 9x6.2 plus the seam allowance and the front piece with 13 (length + tuck in) x 6.2 plus seam allowance. 

3. Sew together one short end of the front and back piece. 

4. On the stitched side of the front piece, wrap the added 4 tuck-in, pin it and if you want staple along the side together so the fabric wont get out of place, when you sew the front and back pieces together.

sewing instructions

I have to admit, I shouldve ironed the fabric before, but if I dont have to, I fight against it! Ironing is just really boring and in time the wrinkles disappear anyways. I know, I am lazy..

The tuck-in serves the purpose, to later hide the pillow in it. 

sewing instructions


5. Lastly, sew the front and back pieces right on right on both long sides and on the not yet sewed short end together.
Obviously the short end with the tuck-in wont be sewed together, so you can insert the
pillow/blanket later on.


sewing instructions


Done.


Back to top

Monday, February 17, 2014

Finally the dolls have a face..


free pattern

Until now I didnt dare to give the rag dolls faces.
Especially when I think about, how hard I worked on the eyes and nose of the stuffed bunnies. And one of the bunnies still looks like as if hes not in his right mind.

I didnt want to deform the dolls with a crooked face.
And on top of it Vladimir thought, that it would look better, if the dolls got realistic eyes. But there is still the nose, thats missing. How am I going to put that on that flat face?

But then I found these pictures of rag dolls with different faces in an old 70ies- house wife craftwork book from my mom and even Vladimir had to admit, that the friendliest looking ones had simple eyes and mouth.

I scanned the page. I know, the quality is bad and the faces hard to recognize, but maybe you can get an idea. The doll on the left bottom is definitely my favorite.


So, authentic faces to and fro, theyre just rag dolls and button eyes and a simple mouth look the best. And to make those was no problem with Stricktwist.


free pattern
free pattern


What an effect a friendly face can have. Before our little Irma didnt know what to do with the dolls, now she gives them more attention. And I even caught her hugging and embracing the doll.


Back to top

Monday, February 10, 2014

Irma’s doll gets a friend..


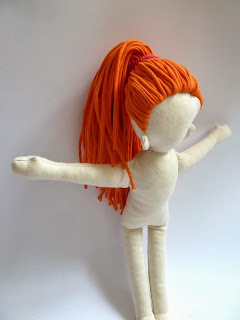
I was a little annoyed, that the first rag dolls hair didnt work that well. I smuggled the bangs into the tails, so they wouldnt stick in all directions.


So I sewed Irma another one, before the first one even had a face.


Schnittmuster und Nähanleitung


Doll number 2 got red hair like Pippi Longstocking and no bangs. I tried really hard to sew even more strands in and left them all long.

Schnittmuster und Nähanleitung


Anyway now the doll has enough hair on her head, to try out different hair styles.

But until Irma will do that, it will take a little while.

Schnittmuster und Nähanleitung

Schnittmuster und Nähanleitung


I am satisfied, but this doll doesnt have a face yet either. I have to get to work on that soon, because without eyes and a mouth the dolls look a little creepy.

Back to top

Sunday, February 2, 2014

Red Velvet Cake Pops for Ada..


For Adas 5th birthday I dabbled at making Cakepops for the first time.

recipe

recipe


Therefor I used the recipe of a Sockerkaka (easy Swedish Sugarcake/ Sandcake)

3 eggs
0.8 cups sugar
1 1/4 cups flour
1 1/2 teaspoons backing powder
3.5 oz melted butter
0.4 cups milk
approx. 1/2 teaspoon lemon oil


1.     Beat eggs and flour until fluffy.

2.     Add all the other ingredients, except the butter.

3.     At the end slowly add melted butter, so the eggs wont curdle.

4.     Put dough in a greased form and bake at 347F for approx. 30-40min.


Frosting:

3.5 oz butter
3.5 oz powder sugar
3.5 oz creme cheese
a couple of drops lemon oil
red food coloring


Icing:

0.5 Ibs white couverture
0.7 oz coconut fat

1.     Let cake cool down and remove crispy ends. Then crumble cake in a bowl with your hands.

2.     Add frosting spoonwise to the dough crumbs and blend. You dont have to use all the frosting, only so much, that the dough is easily moldable (like play dough).

3.     Form balls out of the dough and pu in freezer for about 20min.

4.     Let the couverture melt with the coconut fat in a bain-marie and insert the sticks around 0.4-0.8 and stick into the cold Cakepops. 

5.     Put the Cakepops again for 15min into the freezer.

6.     Then dip into the melted couverture and turn carefully.

7.     While the icing is not dry yet, decorate Cakepops however you please.


recipe

recipe

recipe


recipe


Back to top

Saturday, February 1, 2014

Dolly can now sleep better at night..


I rummaged for lacquer paint at home. The doll bed is so little, its not worth it to buy new paint.
Conveniently, we still had loads of paint you could call old rose and a little white.


DIY


Well, painting the big furniture pieces in Irmas room was way easier, because I only used one color.
Because I chose 2 colors for the bed, I had to touch up some spots a bunch of times and it took me three days. I only had time in the evening and you can only see the mistakes in daylight.

But now its finished and in addition I also sewed a new bedding. The old one was pretty, but a little frumpy.

DIY
Irma testet das neue Puppenbett

DIY


DIY


Back to top